
Как собрать детектор лжи
Arduino — универсальный компьютер. С его помощью можно собрать множество удивительных вещей, в том числе детектор лжи. Это устройство поможет определить, говорят ли вам правду или врут.
Что потребуется:
— Компьютер Arduino Genuino UNO или его аналог
— Плата для соединения контактов
— Кабели
— Сервопривод
— Электродвигатель постоянного тока
— Красный и зелёный светодиоды
— Три резистора
— Пульсометр для Arduino
— Потенциометр
— Источник питания
— Кассовая бумага
— Палочка для крепления ленты
— Проволока
— Пенопласт
— Плата для соединения контактов
— Кабели
— Сервопривод
— Электродвигатель постоянного тока
— Красный и зелёный светодиоды
— Три резистора
— Пульсометр для Arduino
— Потенциометр
— Источник питания
— Кассовая бумага
— Палочка для крепления ленты
— Проволока
— Пенопласт

Читайте еще: Ученые выяснили, как усилить сигнал домашнего Wi-Fi
Соедините компоненты по этой схеме:


Читайте еще: Эксперты назвали самые странные гаджеты 2017 года
Прошейте Arduino с помощью программы UNO этим кодом:
// This code below serves to simulate a lie detector.
//It has been created by Nicolas Baqués and Carolina Romanos.
//First of all all the variables have to be declared.
//SENSOR int pulse=0; //Variable that will convert
//SEVO #include Servo servoMotor; //Declare the servo
//DC MOTOR int motorPin = 9; //DC motor is connected to pin 9
//LEDs
int ledPin1 = 6; // Green LED is connected to pin 6 int ledPin2 = 5; // Red LED is connected to pin 5
////POTENTIOMETER //const int analogPin=0; //int value; //variable que almacena la lectura analógica raw //int position; //posicion del potenciometro en tanto por ciento
void setup() { // put your setup code here, to run once: Serial.begin(9600); //Sets the data rate in bits per second or serial data transmission //SENSOR pinMode(A5,INPUT);//Saying that we are collecting information from A0
//SERVO servoMotor.attach(13);// Servo connected to pin 13
//DC MOTOR pinMode(motorPin, OUTPUT); //Saying that the DC Motor receives information
//LEDs pinMode(ledPin1,OUTPUT); //Saying that the LED receives information pinMode(ledPin2,OUTPUT); //Saying that the LED receives information
}
void loop() { // put your main code here, to run repeatedly: //SENSOR pulse= (analogRead(A0)); //Pulse will be what Arduino reads in A5 Serial.println(pulse); //Print the reading in the monitor serie delay(1);
//SERVO servoMotor.write(0); // Inicial position of the Servo is 0 degrees
if (((600<(analogRead(A0))))){ //Condition for the servo //if the reading in A5 is more than 600 for (int i=0; i<=90; i++){ //The servo will move continously 90 degrees in both directions servoMotor.write(i); delay(25); } for (int i=89; i>0; i—){ servoMotor.write(i); delay(25); } } // // pulse= (analogRead(A5)); // Serial.println(pulse); // delay(100);
if (((600>(analogRead(A0))))){ //Condition for the servo //if the reading in A5 is less than 600 for ( int i = 0; i <= 45; i++){ //The servo will move continously 45 degrees in both directions servoMotor.write(i); delay(25); } for ( int i = 44; i>0; i—){ servoMotor.write(i); delay(25); } }
//DC MOTOR analogWrite(motorPin,64); //Telling the DC motor in Pin 9 the speed we want 64 (slow) delay(100);
//LEDs
if (((600<(analogRead(A0))))){ digitalWrite(ledPin2 , HIGH); // Switch on the LED 2 when analog read is more than 600 digitalWrite(ledPin1 , LOW); // LED 1 stays off when analog read is more than 600 delay (100); } if (((600>(analogRead(A0))))){ digitalWrite(ledPin1, HIGH); //Switch on the LED 1 when analog read is less than 600 digitalWrite(ledPin2 , LOW); // LED 2 stays off when analog read is less than 600 delay (100);
}
} //IMPORTANT: to simulate a person is lying change the analog read of port A5 to A0! //This would make possible to control the data the servo is reading with a potentiometer
Используйте готовую коробку или соберите её самостоятельно из фанеры или пластика. Разместите в коробке все компоненты, а чтобы они не болтались, используйте горячий клей или полиуретановую пену.

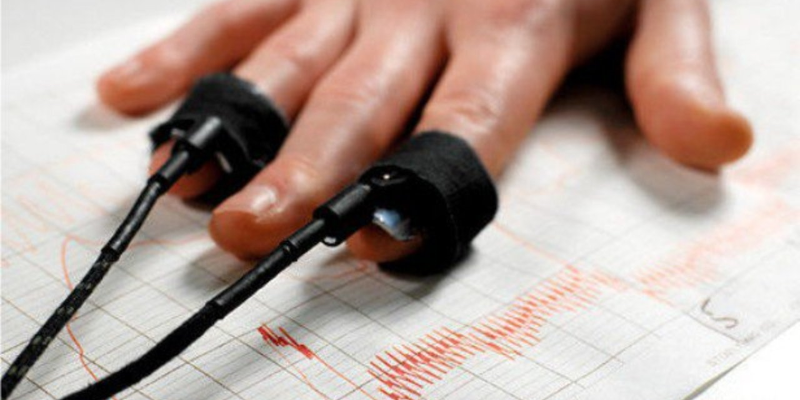
Пульсометр нужно крепить на пульсирующие участки тела (например, пальцы или запястье). Когда человек будет отвечать неправду, он начнёт волноваться, его пульс участится, и детектор отразит изменения на бумаге. Конечно, точность такого детектора невысока, и он вряд ли сравнится с профессиональными аппаратами, которые используются в криминалистике.

Читайте еще на Радар24: Почему на борту пассажирских самолетов нет парашютов?


Немає коментарів:
Дописати коментар